Showing posts with label toys. Show all posts

Friday, June 11, 2010

Review: library finds worth buying!

One of the great things about having a blog is that I can give my opinions an airing. Case in point: knitting books!  Knitting is "hot" right now ... as evidenced by the plethora of knitting books on the market. Separating the wheat from the proverbial (and ubiquitous) chaff can be tough.  I've found some really poorly executed, many over-priced, and others just BLECH!  But some of the crop are really well-done and worth adding to a personal knitting library.
When browsing at the public library the other day, I discovered two books that fall into this latter category:
  1. Knitting New Scarves: 27 Distinctly Modern Designs by Lynne Barr. 
  2. Knitted Toy Tales: Irresistible characters for all ages by Laura Long
Let's start with the scarf book.  I'm normally not one much for scarf books.  What's the point? How tough is it to make a strip of knitted fabric that will fit around one's neck????  But this book is a "sleeper".  This book is much more than a book of typical, ordinary, blah scarves.  Barr does an amazing job of bringing her reading public to a new level -- the stitch techniques rival Unexpected Knitting's uniqueness and artistry.  These scarves are true pieces of art.  To be honest ... I would probably never make these scarves as scarves.  They're a bit too funky and outre for me.  BUT, I would use Barr's various unique techniques in hand-knit designs -- purse embellishments, sweater designs or even for large afghans.  The ideas abound when browsing through this little gem.  Barr opens knitting to new horizons with her twists and turns and needle/yarn interplay.  Sensational!

I'm a sucker for knitted toys -- I think it's a great way to share the art of knitting with kids of all ages and to make something unique and memorable for the recipient.  Laura Long's book, Knitted Toy Tales, is a sight to behold and one of the best I've seen.  And I know what of I speak:  I've designed knitted toys which often get compliments:  Elegant Eliza the Ballerina Bunny, Pinocchio, Tully Greyshanks.  I've done bunnies and bears and penguins and even a cow or two (with matching binkies, of course!).  But Long's book has wonderfully creative toys ... each different than the last (some knitted toys books are just the same design dressed differently 8-<  !).  Long has bunnies, bird, frogs, Matroyshka dolls, bears, pigs, snakes, mice, elephants, fish, penguins, and even Eward Lear's owl and the pussycat in their very own knitted boat!  Very cool stuff that again gets my designer mind working overtime!  Long uses unique construction to make the toys look right (adding fabric and other embellishments to really make these heirloom gifts).  Highly recommend this one!

Check back periodically for other knitting book reviews ... I'll try to post at least a couple each month ... the good, the bad and the ugly!
Happy knittin'
Mary C. Gildersleeve
By Hand, With Heart -- hand-knit designs
bhwh.mary@gmail.com

Wednesday, April 21, 2010

Review: Phoebe's Sweater

I just posted this on my family/learning blog, but wanted to add it here so that my knit-only readers could see this beautiful new book ...

I have a new favorite picture book ... this one combines beautiful, gentle illustrations, with a beautiful gentle story with beautiful knitting patterns at the end ... hmmmm, wonder why I like it so much!

Phoebe's Sweater, the first book from hand-knits designer Joanna Johnson, is a book that raises the bar of what a good picture book could and should be. The story is a sweet story of Phoebe Mouse. Her mom can't play with her so much now as Phoebe is soon to get a sibling. But her mom can knit for her! And her mom knits her a beautiful hooded sweater that keeps Phoebe cozy all through the Fall. A lovely story of family and playing and being outside and loving life.

But, wait, there's more ...

Phoebe and her family are drawn in lovely soft colors by the author's husband, a graphic artist, in his first attempt at book illustrations. He has talent. The illustrations would delight any child ... and have mine trying to imitate the artwork! If you click on Phoebe's Sweater, you can see inside the book and gaze at the illustrations yourself (if you don't believe me).

But, wait, there's more ...

The author didn't stop at the end of the book ... she gave the readers a wonderful gift: knitting directions to make child-sized versions of Phoebe's sweater, knitting directions for making a doll-sized version of the sweater, AND knitting directions for making Phoebe mouse! How cool is that????? String Bean is not going to wait for me to make her a Phoebe ... she is going to attempt the pattern on her own.
What more could I want from a picture book ... knitting, great illustrations, a lovely story ... Oh, and in case you get this book and like this story ... Joanna Johnson has set up a blog so you can follow Phoebe on the Road!
Doesn't that sound like a wonderful book?  The knitted sweater, a hoodie that is nice and long, is designed for sizes 2,4 and 6 ... altho it looks like it is roomy enough to fit a little bit older child.  The Phoebe Mouse toy stands 16" and comes with her own knit-from-the-top down dress.  A very cute design!

I'm thinking Phoebe needs to become friends with my own Elegant Eliza ... the adventures they would have!


Happy knittin'
Mary C. Gildersleeve
By Hand, With Heart -- hand-knit designs
bhwh.mary@gmail.com

Thursday, March 18, 2010

Knit Picks: another of my designs

Introducing -- Elegant Eliza, the Ballerina Bunny.  This knitted toy is knit all in one piece (except for the removable dance skirt) and is really quite fun to make.  Knit Picks has posted the downloadable pattern if you'd like to make her in time for Easter!

BTW, this bunny was inspired by a toy in Lucinda Guy's wonderful And So to Bed ..., which has such lovely baby/toddler knitting designs. 

Look for more of my designs coming soon to Knit Picks wonderful IDP ... a program that is really helping us small, independent hand-knit designers! I've got another up, a scarf, that is not quite so seasonably appropriate but is also fun to knit.


Happy knittin'
Mary C. Gildersleeve
By Hand, With Heart -- hand-knit designs
bhwh.mary@gmail.com

Monday, May 19, 2008

Baby Knitting: Thinking outside the box

One of the MANY things I like about designing hand-knits is that I can think outside the box, go beyond the traditional, and create new traditions.

Here's a great example: a few years ago a friend came to me and asked me to design something for a couple who were having their first baby. I showed her something things I'd made in the past ... a baby blanket with a lamb on it, the christening set, etc. But nothing seemed to be just right.
Then ... my then-6 yod came running in with a stuffed cow I'd knit for her a few years earlier.

Well Jessie just fell in love with Sassie Cassie the cow and wondered if I could do a "cow theme" as the young couple and their new baby would be moving back to the family farm ... a dairy farm!

Here's what I came up with:
A cozy, cow binky (note the white "picket" fence surrounding the field) and a stuffed cow The blanket (which actually was very straight, but the camera angle makes it look a bit catywampus!) has a calico fabric sewn to the back so that the baby didn't get tangled in the intarsia cow.
This was a pretty untraditional baby gift .. but Jessie and the new mom LOVED the set.

Friday, July 27, 2007

Another stuffed toy ....


... my kids can fight over! This one was so much fun to make -- he's a bit on an elf (with a look of Burl Ives a bit, don't you think so?). I love the way his "jelly belly" looks; the tri-colored tam looks great with the tweedy-look of the jacket!


Made in Lion Brand's Cotton-Ease, this knit up like a dream using a size4 needle (switching to an 8 when I doubled the yarn for the tweed look).....

Monday, July 16, 2007

More Road Trip knitting

So, we just got back from another road trip -- this time camping in Mesa Verde and the YMCA of the Rockies at Snow Mountain Ranch ... both EXCELLENT family camping sites and well-worth another 10-day trip!

Needless to say, with minimal driving and maximum camping fun, I didn't get a whole lot of knitting done. I did manage to knit a pair of lace-stitch socks in KnitPicks Essential (washable wool) to wear with ankle-height boots -- knitting from the Front Range to Mesa Verde -- and a stuffed doll with clothes knitted with Lion Brand's "Cotton Ease" (EXCELLENT for kids' toys!) -- that I knit from Mesa Verde to Snow Mountain (Winter Park, CO).In the picture, his dark-green button eyes look more like "shades" and the cap looks like a rakish beret -- but hey, whatever works!

Thursday, April 05, 2007

Way Cool Wooly Lambs

Thanks to Gail's post on Life a la Cart, I have fallen in love with her felted wool sheep. Seems a few years back she bought the Fiber Trends "Felted Flock" pattern to stick in the kids' Easter baskets. Have I mentioned, that I LOVE THESE?

I think, though, I'd have to come up with my own design -- I HATE following directions. So I'll keep y'all posted on my unvention of a felted flock, ok?

BTW, I suggested to Gail who has little time but two children that will be getting these little darlings -- to get different colored ribbon to "collar" the lambs and add a little bell so they'd tinkle as well as look so cuddly cute!

Thursday, March 08, 2007

What I've been working on

I haven't posted any of my own designs in awhile, so I thought I'd show you what I've done lately. I'm working on a new project and these are the first two designs -- a stuffed (with pellets from the neck down, fiberfill for the neck up) varied striped snake (complete with I-cord forked tongue) and a silly cap. Cool huh?

Friday, May 19, 2006

Designing Cuddle Animals - part 2

Yesterday, I started talking about how to design your own cuddle animal. Today, I'd like to move on to Part 2, the actual pattern drafting.

Now I start the actual “pattern drafting”. Knowing the characteristics of knit fabric helps immensely from this point forward:
  • I-cord makes for excellent toes, legs or other skinny appendages.
  • Garter stitch gives texture, no curl and is quite versatile (with short-rowing or other shaping techniques)
  • Stockinette will curl in on the side and roll up on the top and bottom – useful for the edge of an ear or other appendage where you want thickness without doubling the fabric – now, penguins don’t have ears, but I just thought I’d mention the use of SS.It also makes a wonderfully smooth surface that children love to put their check against.
  • Double-knitting if left open on one-side will make a knit-in pocket (perfect for a brood-pouch).
  • Standard short-row heels on socks make a wonderful three-dimensional turning – works great for heads!
  • Even decreases, spread about every third or fourth row, will decrease a round to a nice long, point (great for beaks or other pointy appendages)

I swatched with the size 4s and the off-white as it is easier to count and measure than the black. I got an initial gauge of 16sts and 24 rows over four inches. I estimate how many stitches I’ll need for the body and how big to make the penguin. I’ve decided I’d like him about 12 inches by 15 or 16 inches tall. I add these notes to my sketches. I am just concentrating on the bulk of the animal – the body of the penguin – and will design the appendages later so I can get the dimensions just right.

I like to make my toys almost indestructible – therefore I try to design to be in one piece, with appendages knitted-on as they’re less likely to pull off. I also don’t do button-eyes or added adornments as the children I’ve knitted for end up just pulling them off – ripping the item in the process.

So, now I’m ready to start knitting and designing. In my knitting bag, I’ve got my “design” kit:
  • knitting accessories – stitch markers, blunt-eyed needle, scissors, etc
  • my notebook and pencil – to keep notes; the pencil is to “neatly” erase errors and re-write the directions for what actually worked
  • a three-holed, plastic protector sheet filled with all the images and sketches and notes I’ve taken when researching the penguin
Starting at the bottom, I need to make the feet. For the three-toed feet, I i-cord about an inch, break yarn and start another toe. Once I have all three toes I knit them together and begin to shape a short, stubby foot – but I don’t want this to curl so I add two or three garter edge stitches. When designing from scratch, I just have to knit and rip until I have the foot just the right dimensions. As I knit (and rip), I keep notes.

This is my favorite part of the process because I really feel like a sculptor, molding the knitting to make the shapes out of yarn.

Once I have both feet, I’ll break the black and begin the shaping of the off-white front. As I mentioned, I want a brood pouch for the egg so (after a quick dive into the closet to find a white Easter egg) I measure the length of the egg and make a double-knit pouch in the center of the body that is the right size – not forgetting that knit stretches so I make the pouch just a bit smaller than my actual egg. At the same time, I’m short-row shaping a bit of belly on Captain Cook – that’s what gives him the curved look in the picture.

Once I have the double-knit brood pouch big enough, I stop and begin the back.
I created a short balancing tail in black (but decided I didn’t like it, so I ripped back) and then quickly increased to the width of the off-white front. I continue knitting until the back measures the same as the front – I want to join these two sections as quickly as possible so that I have only one major seam to sew after stuffing. I then work both front and back until I like the size of the penguin. Then I begin to shape for the neck. Even decreases (full-fashioned) on the “seam” lines will create just the curve I want. I’m looking at the knitted penguin constantly to determine if the shaping is right and if I need to slow down or increase to get the right shape.

The whole time I’m making notes of what I’m doing (or erasing what didn’t work). I decide the shoulders are narrowed enough and do a few center decreases to make the neck. I break the off-white and using only black I then make the head – which is no more than shaping the heel of a sock. I prefer the short-row method for a heel as this makes for a nice rounded head. I then pick up all stitches and decrease at a “pleasing” rate to create my long, pointy beak.

This is one of those things you just have to practice with – I think this was the point where I did the most “knit-rip-knit” until I got the beak just right.

I stuff the penguin, even though I’m not quite done yet with all the body parts – after sewing the small gap on one side and tugging in any lose ends. Since the ends will all be inside the toy – I make sure the knots holding the yarn ends together are firm. I’ve found an overhand knot holds better (even after washing many times) than a square knot. To sew up the large opening, I crochet the two pieces together using black – starting at the bottom and ending the slip-stitch about 5 stitches from the neck. This leaves the black yarn up near the shoulder and I can begin the flipper without breaking the yarn. I then pickup about a third of these stitches on dpns and work a garter stitch flipper that starts first as a short-row technique and then shifts to a bias-knitting technique to get the flipper to lay up and away from the body. Knitting on in this way makes a strong bond between the flipper and the penguin body that would be almost impossible for a child to pull off. I repeat this same procedure on the already closed side, so that both sides are identical (except for the infamous “reverse shaping”) As I mentioned before, I like to knit in as few pieces as possible so that not only is it hard to tear or ruin the toy; you’re done with toy when you finish that last appendage!

I design while I knit – much like a painter who doesn’t know exactly what he’s going to paint until he’s finished. I have a basic idea and then help the yarn mold into position. Yarn is a very wonderful medium because of its properties – stable and yet elastic. The more you knit the more you’ll find that a technique you’ve only used for socks can be easily converted to making a penguin head!

Try this technique – it’s not hard and is actually a lot of fun.You can make a child in your life happy with their own, custom-designed cuddle toy that will last for many years!

Thursday, May 18, 2006

Designing Cuddle Animals - part 1

If you have children, grandchildren or just love to knit fun things, eventually you will be asked (or will want) to knit an animal. I have five children and at one time or another I have designed a lamb complete with lederhosen, a bunny wearing a sweater, a bear, a cow, a T-rex, a penguin and a chick. I currently have requests for a polar bear and a Dalmatian puppy waiting for my needles to free-up.

I have designed these each myself – not resorting to someone else’s idea of what my children wanted. I have sold some of these designs for publication and some we’ve kept in the family. I just did 
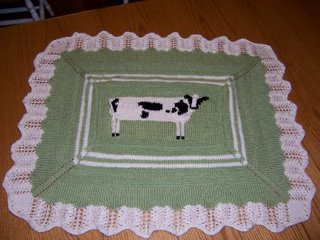
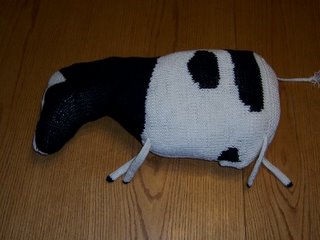
a cow (with matching blanket) for a friend who wanted a unique baby present for a family that owns a dairy farm. Each time, I have made these designs slightly different, imbuing each with its own personality and that of the one I was making it for. I also design them to be extremely huggable and long-lasting.

So, enough about me. How can you do something similar? In this article, I’ll explain my design process and give you tips on how to create any animal (or stuffed “thing”) you can think of. For this article, we’ll use the penguin that I made for my son. We’d just read Mr. Popper’s Penguins and my youngest was penguin-crazy!

The first thing you must do is really look at what a penguin looks like – there are different breeds of penguins so you need to decide which one you want to emulate. Check you local library – particularly in the kids’ section – for books about penguins. Many children’s books have excellent illustrations, fine details, and interesting information in an easy- and quick-to-read format. If you have Internet access, do a “Google Image” search on penguins. You’ll get many more pictures than you can use!

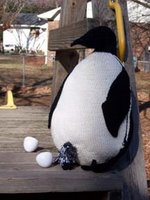
We chose the Emperor penguin because it’s the largest breed and the egg is kept in the dad’s egg-pouch during incubation – an interesting design detail that I wanted to include for my son’s penguin. It also has the simplest coloring – black and off-white with just a flash of yellow at the throat. Reading about the Emperor penguin helped me understand how he can live in the Earth’s harshest climate – short-stubby clawed feet for crawling up the icy rocks, a tail for balancing, flippers for swimming and a sharp, long beak for pecking at the krill it eats.

Now that I had a general idea of the penguin I wanted to make and the basic body parts necessary, I then went to sketching what I wanted the penguin to look like. Don’t let this step throw you if you’re not an artist – I’m not either. Which probably ends up being better for the end result. I sketch the basic shape that I want and mark in color changes or body parts. I look at the images from the Google search – usually a few cartoon or line-drawn pictures come up on the search that can help give me an idea of the basic shape.

For a penguin, its shape is basically a rounded triangle with feet, a short tail, and a knobby head with a pointy beak. I wanted it to be highly cuddle-able, so I made him wide at the bottom and tapered him into the neck area. I decided to stick to just a black-and-white penguin and ignore the bit of yellow at the neck.

I had my basic shape, my colors and approximate dimensions. Off to the yarn store to find just the right yarn for my penguin. I knew I wanted to add an egg pouch – one of the most unique things about the Emperor – and a baby penguin inside the egg. So I would need black, off-white, and a fuzzy novelty yarn for the baby penguin (who comes out of the egg just a ball of feathers!).

Because this toy is for playing, cuddling, sleeping and using as a football, I knew I needed to use a yarn that would be soft but sturdy, washable but wouldn’t be plastic-y. I found the perfect yarn: Coats and Clarks has come out with a cotton/acrylic blend that is soft and works up nicely – TLC Cotton Plus. This is a worsted weight yarn so a US-size 8 needle would give a gauge of about 20sts x 25rows over a four-inch swatch. For a stuffed toy, you want the knitting firm but flexible. With a worsted weight yarn, I use a US-size 4 needle and get just the “hand” (or feel) that I want. Because I wasn’t sure of how much yarn I would need, I overbought, knowing that I could return the yarn if I needed to (or slip it into my stash -- which I usually do!).

Check you stash before yarn hunting – with some toys you might need just a bit of yarn – for instance with the baby penguin to go in the brood pouch, I founda novelty, fluffy acrylic that had flakes of black, white and grey – and I only needed a partial ball.

I purchased four balls of black and four of off-white and actually used two skeins of black and one off-white skein.

end Part 1

Tomorrow I'll post Part 2 -- the actual "pattern drafting" (which sounds daunting, but it's not at all!)

Monday, February 27, 2006

Knitting the Animals!

I just finished a commissioned baby blanket and stuffed toy. The parents of the pending Birthday Boy are heirs to a dairy farm. The nursery is cows so when their friend saw String Bean's "Sassy Cassie Cow" (which has had much stuffing removed during nap times!) and Bam-Bam's Lamb binky -- I had a sale!

Here's the end result:


This commission came just as I had finished "Captain Cook" (see Mr. Popper's Penguins) for Bam-Bam!