Happy Memorial Day!
Don't forget how much knitting became a usual, everyday pasttime because of the need to outfit soldiers on foreign soil. Here are some articles about military knitting: Military Spouses Soldier On from New Jersey and Knitters Do Their Thing for Soldiers from Ohio. These are great examples of how knitting can really make a difference.
There's a great chunk in the knitting history book, No Idle Hands: The Social History of American Knitting by Anne Macdonald which details some of the many patterns and uses the hand-knits were used for when the homefront worked to support the various wars. The Red Cross still has patterns available to knit for the soldiers.
What are you doing this Memorial Day to honor those who fight for us?

Monday, May 29, 2006
Thursday, May 25, 2006
Sorry, I've been remiss ...
in keeping up with my knitting blog. We're in the midst of finishing our time here in South Carolina, then heading to Colorado for 2 weeks than taking the big white bird to Austria -- for the next few years.
I've been packing, storing, trashing, sorting. I've been sending emails and checking on flights. I've been finishing the homeschooling year and working on records.
I HAVE NOT been knitting.
I have a pair of socks, working them on two circs at one time, that I've had on the needles for more than a month. I love these socks. I love the lace pattern I've chosen for the front. I love the way the toe-up sock is coming out. I love the k1p1 rib I've got for the sole. I love the color gradations of this wool from KnitPicks (a yarn they don't seem to carry anymore, which I love working with, called Simple Stripes in a blues/greys/cream colorway).
I don't love that I haven't been able to knit!
This weekend dh is taking me for a romantic getaway. We can only spare one night; our kids (ages 17 down to 3) would act up if we stayed away longer. So Friday night, as we drive up into the BlueRidge, I will be knitting. I will be knitting on the way back on Saturday. I will continue to knit until I get these socks done.
This Friday will be a bonus weekend -- not only will I have some hard-earned time away just with dh, I may actually be able to finish my "never-getting-knit-on" lovely socks! I'll post a picture of before the trip and after.....
Friday, May 19, 2006
Designing Cuddle Animals - part 2
Yesterday, I started talking about how to design your own cuddle animal. Today, I'd like to move on to Part 2, the actual pattern drafting.
Now I start the actual “pattern drafting”. Knowing the characteristics of knit fabric helps immensely from this point forward:
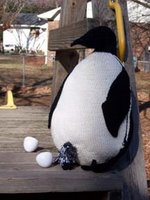
I swatched with the size 4s and the off-white as it is easier to count and measure than the black. I got an initial gauge of 16sts and 24 rows over four inches. I estimate how many stitches I’ll need for the body and how big to make the penguin. I’ve decided I’d like him about 12 inches by 15 or 16 inches tall. I add these notes to my sketches. I am just concentrating on the bulk of the animal – the body of the penguin – and will design the appendages later so I can get the dimensions just right.
I like to make my toys almost indestructible – therefore I try to design to be in one piece, with appendages knitted-on as they’re less likely to pull off. I also don’t do button-eyes or added adornments as the children I’ve knitted for end up just pulling them off – ripping the item in the process.
So, now I’m ready to start knitting and designing. In my knitting bag, I’ve got my “design” kit:
This is my favorite part of the process because I really feel like a sculptor, molding the knitting to make the shapes out of yarn.
Once I have both feet, I’ll break the black and begin the shaping of the off-white front. As I mentioned, I want a brood pouch for the egg so (after a quick dive into the closet to find a white Easter egg) I measure the length of the egg and make a double-knit pouch in the center of the body that is the right size – not forgetting that knit stretches so I make the pouch just a bit smaller than my actual egg. At the same time, I’m short-row shaping a bit of belly on Captain Cook – that’s what gives him the curved look in the picture.
Once I have the double-knit brood pouch big enough, I stop and begin the back.
I created a short balancing tail in black (but decided I didn’t like it, so I ripped back) and then quickly increased to the width of the off-white front. I continue knitting until the back measures the same as the front – I want to join these two sections as quickly as possible so that I have only one major seam to sew after stuffing. I then work both front and back until I like the size of the penguin. Then I begin to shape for the neck. Even decreases (full-fashioned) on the “seam” lines will create just the curve I want. I’m looking at the knitted penguin constantly to determine if the shaping is right and if I need to slow down or increase to get the right shape.
The whole time I’m making notes of what I’m doing (or erasing what didn’t work). I decide the shoulders are narrowed enough and do a few center decreases to make the neck. I break the off-white and using only black I then make the head – which is no more than shaping the heel of a sock. I prefer the short-row method for a heel as this makes for a nice rounded head. I then pick up all stitches and decrease at a “pleasing” rate to create my long, pointy beak.
This is one of those things you just have to practice with – I think this was the point where I did the most “knit-rip-knit” until I got the beak just right.
I stuff the penguin, even though I’m not quite done yet with all the body parts – after sewing the small gap on one side and tugging in any lose ends. Since the ends will all be inside the toy – I make sure the knots holding the yarn ends together are firm. I’ve found an overhand knot holds better (even after washing many times) than a square knot. To sew up the large opening, I crochet the two pieces together using black – starting at the bottom and ending the slip-stitch about 5 stitches from the neck. This leaves the black yarn up near the shoulder and I can begin the flipper without breaking the yarn. I then pickup about a third of these stitches on dpns and work a garter stitch flipper that starts first as a short-row technique and then shifts to a bias-knitting technique to get the flipper to lay up and away from the body. Knitting on in this way makes a strong bond between the flipper and the penguin body that would be almost impossible for a child to pull off. I repeat this same procedure on the already closed side, so that both sides are identical (except for the infamous “reverse shaping”) As I mentioned before, I like to knit in as few pieces as possible so that not only is it hard to tear or ruin the toy; you’re done with toy when you finish that last appendage!
I design while I knit – much like a painter who doesn’t know exactly what he’s going to paint until he’s finished. I have a basic idea and then help the yarn mold into position. Yarn is a very wonderful medium because of its properties – stable and yet elastic. The more you knit the more you’ll find that a technique you’ve only used for socks can be easily converted to making a penguin head!
Try this technique – it’s not hard and is actually a lot of fun.You can make a child in your life happy with their own, custom-designed cuddle toy that will last for many years!
Now I start the actual “pattern drafting”. Knowing the characteristics of knit fabric helps immensely from this point forward:
- I-cord makes for excellent toes, legs or other skinny appendages.
- Garter stitch gives texture, no curl and is quite versatile (with short-rowing or other shaping techniques)
- Stockinette will curl in on the side and roll up on the top and bottom – useful for the edge of an ear or other appendage where you want thickness without doubling the fabric – now, penguins don’t have ears, but I just thought I’d mention the use of SS.It also makes a wonderfully smooth surface that children love to put their check against.
- Double-knitting if left open on one-side will make a knit-in pocket (perfect for a brood-pouch).
- Standard short-row heels on socks make a wonderful three-dimensional turning – works great for heads!
- Even decreases, spread about every third or fourth row, will decrease a round to a nice long, point (great for beaks or other pointy appendages)
I swatched with the size 4s and the off-white as it is easier to count and measure than the black. I got an initial gauge of 16sts and 24 rows over four inches. I estimate how many stitches I’ll need for the body and how big to make the penguin. I’ve decided I’d like him about 12 inches by 15 or 16 inches tall. I add these notes to my sketches. I am just concentrating on the bulk of the animal – the body of the penguin – and will design the appendages later so I can get the dimensions just right.
I like to make my toys almost indestructible – therefore I try to design to be in one piece, with appendages knitted-on as they’re less likely to pull off. I also don’t do button-eyes or added adornments as the children I’ve knitted for end up just pulling them off – ripping the item in the process.
So, now I’m ready to start knitting and designing. In my knitting bag, I’ve got my “design” kit:
- knitting accessories – stitch markers, blunt-eyed needle, scissors, etc
- my notebook and pencil – to keep notes; the pencil is to “neatly” erase errors and re-write the directions for what actually worked
- a three-holed, plastic protector sheet filled with all the images and sketches and notes I’ve taken when researching the penguin
This is my favorite part of the process because I really feel like a sculptor, molding the knitting to make the shapes out of yarn.
Once I have both feet, I’ll break the black and begin the shaping of the off-white front. As I mentioned, I want a brood pouch for the egg so (after a quick dive into the closet to find a white Easter egg) I measure the length of the egg and make a double-knit pouch in the center of the body that is the right size – not forgetting that knit stretches so I make the pouch just a bit smaller than my actual egg. At the same time, I’m short-row shaping a bit of belly on Captain Cook – that’s what gives him the curved look in the picture.
Once I have the double-knit brood pouch big enough, I stop and begin the back.
I created a short balancing tail in black (but decided I didn’t like it, so I ripped back) and then quickly increased to the width of the off-white front. I continue knitting until the back measures the same as the front – I want to join these two sections as quickly as possible so that I have only one major seam to sew after stuffing. I then work both front and back until I like the size of the penguin. Then I begin to shape for the neck. Even decreases (full-fashioned) on the “seam” lines will create just the curve I want. I’m looking at the knitted penguin constantly to determine if the shaping is right and if I need to slow down or increase to get the right shape.
The whole time I’m making notes of what I’m doing (or erasing what didn’t work). I decide the shoulders are narrowed enough and do a few center decreases to make the neck. I break the off-white and using only black I then make the head – which is no more than shaping the heel of a sock. I prefer the short-row method for a heel as this makes for a nice rounded head. I then pick up all stitches and decrease at a “pleasing” rate to create my long, pointy beak.
This is one of those things you just have to practice with – I think this was the point where I did the most “knit-rip-knit” until I got the beak just right.
I stuff the penguin, even though I’m not quite done yet with all the body parts – after sewing the small gap on one side and tugging in any lose ends. Since the ends will all be inside the toy – I make sure the knots holding the yarn ends together are firm. I’ve found an overhand knot holds better (even after washing many times) than a square knot. To sew up the large opening, I crochet the two pieces together using black – starting at the bottom and ending the slip-stitch about 5 stitches from the neck. This leaves the black yarn up near the shoulder and I can begin the flipper without breaking the yarn. I then pickup about a third of these stitches on dpns and work a garter stitch flipper that starts first as a short-row technique and then shifts to a bias-knitting technique to get the flipper to lay up and away from the body. Knitting on in this way makes a strong bond between the flipper and the penguin body that would be almost impossible for a child to pull off. I repeat this same procedure on the already closed side, so that both sides are identical (except for the infamous “reverse shaping”) As I mentioned before, I like to knit in as few pieces as possible so that not only is it hard to tear or ruin the toy; you’re done with toy when you finish that last appendage!
I design while I knit – much like a painter who doesn’t know exactly what he’s going to paint until he’s finished. I have a basic idea and then help the yarn mold into position. Yarn is a very wonderful medium because of its properties – stable and yet elastic. The more you knit the more you’ll find that a technique you’ve only used for socks can be easily converted to making a penguin head!
Try this technique – it’s not hard and is actually a lot of fun.You can make a child in your life happy with their own, custom-designed cuddle toy that will last for many years!
Thursday, May 18, 2006
Designing Cuddle Animals - part 1
If you have children, grandchildren or just love to knit fun things, eventually you will be asked (or will want) to knit an animal. I have five children and at one time or another I have designed a lamb complete with lederhosen, a bunny wearing a sweater, a bear, a cow, a T-rex, a penguin and a chick. I currently have requests for a polar bear and a Dalmatian puppy waiting for my needles to free-up.
I have designed these each myself – not resorting to someone else’s idea of what my children wanted. I have sold some of these designs for publication and some we’ve kept in the family. I just did a cow (with matching blanket) for a friend who wanted a unique baby present for a family that owns a dairy farm. Each time, I have made these designs slightly different, imbuing each with its own personality and that of the one I was making it for. I also design them to be extremely huggable and long-lasting.
So, enough about me. How can you do something similar? In this article, I’ll explain my design process and give you tips on how to create any animal (or stuffed “thing”) you can think of. For this article, we’ll use the penguin that I made for my son. We’d just read Mr. Popper’s Penguins and my youngest was penguin-crazy!
The first thing you must do is really look at what a penguin looks like – there are different breeds of penguins so you need to decide which one you want to emulate. Check you local library – particularly in the kids’ section – for books about penguins. Many children’s books have excellent illustrations, fine details, and interesting information in an easy- and quick-to-read format. If you have Internet access, do a “Google Image” search on penguins. You’ll get many more pictures than you can use!
We chose the Emperor penguin because it’s the largest breed and the egg is kept in the dad’s egg-pouch during incubation – an interesting design detail that I wanted to include for my son’s penguin. It also has the simplest coloring – black and off-white with just a flash of yellow at the throat. Reading about the Emperor penguin helped me understand how he can live in the Earth’s harshest climate – short-stubby clawed feet for crawling up the icy rocks, a tail for balancing, flippers for swimming and a sharp, long beak for pecking at the krill it eats.
Now that I had a general idea of the penguin I wanted to make and the basic body parts necessary, I then went to sketching what I wanted the penguin to look like. Don’t let this step throw you if you’re not an artist – I’m not either. Which probably ends up being better for the end result. I sketch the basic shape that I want and mark in color changes or body parts. I look at the images from the Google search – usually a few cartoon or line-drawn pictures come up on the search that can help give me an idea of the basic shape.
For a penguin, its shape is basically a rounded triangle with feet, a short tail, and a knobby head with a pointy beak. I wanted it to be highly cuddle-able, so I made him wide at the bottom and tapered him into the neck area. I decided to stick to just a black-and-white penguin and ignore the bit of yellow at the neck.
I had my basic shape, my colors and approximate dimensions. Off to the yarn store to find just the right yarn for my penguin. I knew I wanted to add an egg pouch – one of the most unique things about the Emperor – and a baby penguin inside the egg. So I would need black, off-white, and a fuzzy novelty yarn for the baby penguin (who comes out of the egg just a ball of feathers!).
Because this toy is for playing, cuddling, sleeping and using as a football, I knew I needed to use a yarn that would be soft but sturdy, washable but wouldn’t be plastic-y. I found the perfect yarn: Coats and Clarks has come out with a cotton/acrylic blend that is soft and works up nicely – TLC Cotton Plus. This is a worsted weight yarn so a US-size 8 needle would give a gauge of about 20sts x 25rows over a four-inch swatch. For a stuffed toy, you want the knitting firm but flexible. With a worsted weight yarn, I use a US-size 4 needle and get just the “hand” (or feel) that I want. Because I wasn’t sure of how much yarn I would need, I overbought, knowing that I could return the yarn if I needed to (or slip it into my stash -- which I usually do!).
Check you stash before yarn hunting – with some toys you might need just a bit of yarn – for instance with the baby penguin to go in the brood pouch, I founda novelty, fluffy acrylic that had flakes of black, white and grey – and I only needed a partial ball.
I purchased four balls of black and four of off-white and actually used two skeins of black and one off-white skein.
Tomorrow I'll post Part 2 -- the actual "pattern drafting" (which sounds daunting, but it's not at all!)
I have designed these each myself – not resorting to someone else’s idea of what my children wanted. I have sold some of these designs for publication and some we’ve kept in the family. I just did a cow (with matching blanket) for a friend who wanted a unique baby present for a family that owns a dairy farm. Each time, I have made these designs slightly different, imbuing each with its own personality and that of the one I was making it for. I also design them to be extremely huggable and long-lasting.

So, enough about me. How can you do something similar? In this article, I’ll explain my design process and give you tips on how to create any animal (or stuffed “thing”) you can think of. For this article, we’ll use the penguin that I made for my son. We’d just read Mr. Popper’s Penguins and my youngest was penguin-crazy!
The first thing you must do is really look at what a penguin looks like – there are different breeds of penguins so you need to decide which one you want to emulate. Check you local library – particularly in the kids’ section – for books about penguins. Many children’s books have excellent illustrations, fine details, and interesting information in an easy- and quick-to-read format. If you have Internet access, do a “Google Image” search on penguins. You’ll get many more pictures than you can use!
We chose the Emperor penguin because it’s the largest breed and the egg is kept in the dad’s egg-pouch during incubation – an interesting design detail that I wanted to include for my son’s penguin. It also has the simplest coloring – black and off-white with just a flash of yellow at the throat. Reading about the Emperor penguin helped me understand how he can live in the Earth’s harshest climate – short-stubby clawed feet for crawling up the icy rocks, a tail for balancing, flippers for swimming and a sharp, long beak for pecking at the krill it eats.
Now that I had a general idea of the penguin I wanted to make and the basic body parts necessary, I then went to sketching what I wanted the penguin to look like. Don’t let this step throw you if you’re not an artist – I’m not either. Which probably ends up being better for the end result. I sketch the basic shape that I want and mark in color changes or body parts. I look at the images from the Google search – usually a few cartoon or line-drawn pictures come up on the search that can help give me an idea of the basic shape.
For a penguin, its shape is basically a rounded triangle with feet, a short tail, and a knobby head with a pointy beak. I wanted it to be highly cuddle-able, so I made him wide at the bottom and tapered him into the neck area. I decided to stick to just a black-and-white penguin and ignore the bit of yellow at the neck.
I had my basic shape, my colors and approximate dimensions. Off to the yarn store to find just the right yarn for my penguin. I knew I wanted to add an egg pouch – one of the most unique things about the Emperor – and a baby penguin inside the egg. So I would need black, off-white, and a fuzzy novelty yarn for the baby penguin (who comes out of the egg just a ball of feathers!).
Because this toy is for playing, cuddling, sleeping and using as a football, I knew I needed to use a yarn that would be soft but sturdy, washable but wouldn’t be plastic-y. I found the perfect yarn: Coats and Clarks has come out with a cotton/acrylic blend that is soft and works up nicely – TLC Cotton Plus. This is a worsted weight yarn so a US-size 8 needle would give a gauge of about 20sts x 25rows over a four-inch swatch. For a stuffed toy, you want the knitting firm but flexible. With a worsted weight yarn, I use a US-size 4 needle and get just the “hand” (or feel) that I want. Because I wasn’t sure of how much yarn I would need, I overbought, knowing that I could return the yarn if I needed to (or slip it into my stash -- which I usually do!).
Check you stash before yarn hunting – with some toys you might need just a bit of yarn – for instance with the baby penguin to go in the brood pouch, I founda novelty, fluffy acrylic that had flakes of black, white and grey – and I only needed a partial ball.
I purchased four balls of black and four of off-white and actually used two skeins of black and one off-white skein.
end Part 1
Tomorrow I'll post Part 2 -- the actual "pattern drafting" (which sounds daunting, but it's not at all!)
Tuesday, May 16, 2006
Sleeve lengths and Ann Budd

I just unearthed my copy of Ann Budd's book, The Knitter's Handy Book of Sweater Patterns, and there is a great description of sleeve anatomy on page 198. With the posts below, reading Budd's additional comments might help make all this even more clear.
Designing Your Own 102 -- sleeves revisited
One thing I really like to do to make a set-in sleeve -- especially when I'm not sure how long I want to make the sleeve (or not sure if my yarn will hold out to make a long sleeve) -- I knit the sleeve in from the top. That's how I did the Edelweiss sleeves.
Here's what you want to do (make sure you understand "short rows" before attempting this feat!).
You can do the same thing to make a cap-sleeve by increasing by 2 or 3 each time before you wrap the stitch....
Try it!
Here's what you want to do (make sure you understand "short rows" before attempting this feat!).
- After seaming the armhole, use a circular needle and begin to pickup stitches around the armhole, starting in the center of the underarm bound-off stitches. Pickup stitch-for-stitch on the bind-off edge and any decreases for shaping; then pick up 3 of every 4 on the vertical edges.
- Count the number of stitches. Say you've picked up 72 stitches total. Divide by 3 (yes, you will be using lots of math in knitting, sorry!). This gives us 24 stitches.
- Now we're going to start short-rowing the sleeve top:
-- knit the first 24 stitches, place a yarn marker, knit the next 24, * put yarn to front, slip next stitch, put yarn back, turn * (from * * is called wrapping a stitch) and purl back to the yarn marker.
-- wrap the next stitch, knit back across ending with knitting the stitch you wrapped in the previous knit row (now you've knit 25 stitches)
-- continue knitting in this way until you've knit all but the bound off stitches, then you're done short-rowing and you'll work even for a row or two on all 72 stitches. - Work even for an inch than begin decreasing evenly both sides every 4th row till your sleeve is the length you want....
You can do the same thing to make a cap-sleeve by increasing by 2 or 3 each time before you wrap the stitch....
Try it!
Designing Your Own 102 -- sleeves
In a recent post, Designing Your Own 101, I explained how to design a sweater that you'll enjoy using Ann Budd's books. My friend Jenn mentioned that she was good-to-go on all aspects but Budd hadn't mentioned how to do short sleeves.
Here's what I would do:
How's that -- clear as mud?
Here's what I would do:
- Measure a sweater or t-shirt that has the length short-sleeve you like. Measure from the top of the sleeve (where it joins the shoulder) down to the "hem". Length B is the measure from the underarm join to the hem.
- Also measure the circumference in two places, a: at the hem and b: just where it joins the underarm. If using a form-fitting t-shirt to measure, add a bit to the circumferences as the sweater will be thicker (maybe add an inch or so for comfort).
- Using your gauge (yes, it's the bane of most knitters but it is also extremely important), cast on the number of stitches necessary to obtain that Circumference A. Increase stitches evenly on both sides of sleeve until you have the length to underarm (Length B) that you want and the Circumference B you want. You can do the math -- how many rows will give me the length I want? How many stitches do I need to increase for CircumB? How often should I increase -- usually you can fudge this a bit: increase one each side every 2 or 4th row depending and then knit even till it's the right length.
- Follow the directions in Budd's book for fitting the sleeve into the sweater -- this is all dependent on the style of body -- did you bind off for the underarm and then decrease a few to make a fitted arm or did you just do a straight armhole with no shaping. This way will work with ANY style sleeve -- raglan, yoke, set-in or square.....
How's that -- clear as mud?
Monday, May 15, 2006
YNot Knit -- a great book for beginner and pro
 I mentioned the book, YNot Knit by Jill and Susan Wolcott last week and I was fortunate enough to get a copy.
This is a real gem of a knitting book! The Wolcott sisters do an excellent job of teaching both beginner and experienced knitters how to knit "Continental" -- that is, holding the yarn in your left hand and "picking" the yarn as you knit. As the sisters explain, Continental knitting is more ergonomically useful and helps avoid carpal tunnel (a result of the way many knitters "throw" their yarn with their right hand with English knitting).
I learned to knit Continental at the first TKGA conference, back in 1985. Alice Starmore, just coming to the notice of the American knitting population, taught a class on Fair Isle knitting. She recommended learning to use both hands to knit -- with two-color knitting, this makes the "floats" smoother and the tension more even.
I never even thought to try Continental exclusively. But with the Wolcott book in hand, it seems VERY doable! The illustrations and step-by-step instructions are amazingly clear. From putting the yarn on the needle to cast on all the way through binding off, the directions are clear, concise and in a chatty way. These ladies know how to "talk knitting".
There are interesting tips and trivia sprinkled throughout the book and lots of helpful advice on some of the things many books omit -- how to tuck in ends neatly, the problems with all stockinette (it "rocks and rolls" as Jill explains), how to read directions by translating the exact direction (e.g., "1x1 rib" = "knit one, purl one rib stitch"), and other helpful tips.
All the information in this book is written with the assumption that the reader has never tried to knit before. But the book is just as applicable to an experienced knitter as it clearly defines and describes continental knitting.
The projects scattered through the book are all scarves -- taking the stitch lesson and creating a scarf as simple as the traditional, one-color garter all the way through to a beautiful sampler scarf that makes the most of the stitches described.
I also like the way the sisters describe knitting: "Knitting itself is awesome....As the original binary code (knit, purl vs 0,1) it has exponential possibilities, but is so basic that even a beginner can create cool things," writes Jill in the introduction.
Susan mentions that "It's (continental) ergonomic, efficient and ideal for left-handers like me. I can knit longer, have no overuse discomfort, and my tension is great...many (experienced knitters) find that it can extend the length of time they can knit and that the repetitive use discomfort often experienced with the English method does not occur."
This 5x8, spiral-bound volume is definitely a book that all knitters -- experienced or beginner -- should put on their wish list.
Friday, May 12, 2006
Sisters' new book asks "YNotKnit"
The talented Y2Knit sister team of Jill and Susan Wolcott has just published a new book called YNotKnit according to a news story that Amy linked on her Knitting News blog. You can read the full story here. The book sounds VERY promising.
Now the Wolcott sisters have a very cool thing going -- they live on opposite Coasts and yet have created a knitting business which allows them to work together. Thier retreats are reportedly fabulous times although I've never been able to find the time to head to one. Maybe someday....
And yes, Jill is the one who wrote those words in my "ain't it the truth" quote block on the sidebar. That's how much into knitting she is!
Thursday, May 11, 2006
A Fun Knitting Book
I've seen For the Love of Knitting: A Celebration of the Knitter's Art in catalogs and in the bookstore. It looked like one of those books non-knitters give their knitter friends. The kind of book that has taken the bookshelves by storm -- written by non-knitters to capitalize on the recent interest in knitting.
While at the library the other day, after having found "only two books each" for my littles I decided to wander over to the knitting shelves (746-ish in the Dewey Decimal system) and see if there was anything of interest.
And that was two days ago and I've been snatching minutes to read this wonderful book. The articles are by real knitters for real knitters. One article that particularly struck home was by knitter Lela Nargi about excitedly adding to your stash of yarn at a yarn sale and then having to hide it (and eventually get rid of it) because it wasn't as glorious as you thought. Believe me, real knitters do this all the time!
This book is chock full of wonderful articles and short stories that strike at the heart of all knitters. But, more than that. This book is great for those of us who love all things about knitting -- the history, goofy patterns, posters that show knitting. All things knitting!
Check it out at your Library today!
Monday, May 08, 2006
More Knitting in Art!
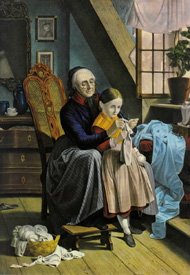
 This one is by an artist named Emile Munier (1840-1895) from the mid 1800's.
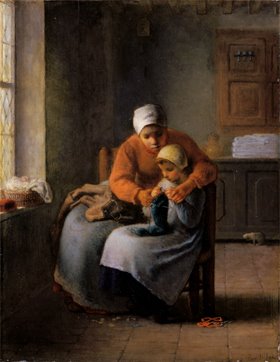 Jean-Francois Millet (1814-1875) painted this famous picture titled "The Knitting Lesson" about 1854.
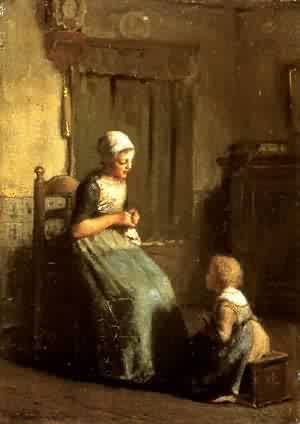 Here's one by Albert Neuhuijs, a Dutch painter(1844-1914). For english sites about his work, check for Albert Neuhuys.
This is a print from Currier and Ives.
Thursday, May 04, 2006
Designing Your Own 101
A friend named Jenn mentioned wanting a certain type of sweater to knit. Living Knitting ..... musings of a design-artist: Sweater for those not-so warm days wearing a sleeveless dress was the start of the conversation, within the comments section of this posting.
It seemed an appropriate time to mention a great resource. Ann Budd, a knitwear designer of note (and editor of Interweave Knits) has compiled a resource that should answer Jenn's query: The Knitter's Handy Book of Sweater Patterns by Ann Budd. This book would suit Jenn's situation perfectly. In this book Budd breaks down sweater design into about eight styles and then explains how to plan THE sweater you're wanting.
For instance, Jenn wants a short sleeved, not too tight, pullover with an easy neckline. Budd's book would have Jenn knit a swatch in whatever yarn she wants to use, measure and determine the gauge, and then gives the numbers for the stitches to cast on, the rows to knit, when to bind off for underarms, etc. Short set-in sleeves are explained as well as neckline variations. This would give Jenn a very simple, all knit sweater.
If Jenn wanted to get fancy, she could add stitch patterns (based on the gauge and number of stitches) or color work, or whatever she wanted to create HER OWN SWEATER!
Yes, knitwear designing is that easy, that basic. Budd's book could very easily become your one-stop source for knitting the baby a sweater, your niece a sweater, a nephew a jacket and dear husband a ski sweater! And all from one book!
It's not just little old ladies anymore (was it ever?)
Thanks to a mention on Knitting News, here's a great article that will have you understanding that knitting is not just for little old ladies; it will change the way you look at needles and yarn and the hot little hands clutching them, trying to create someting wonderful. This article is from the LA Times no less!
Tuesday, May 02, 2006
Sweater for those not-so warm days wearing a sleeveless dress
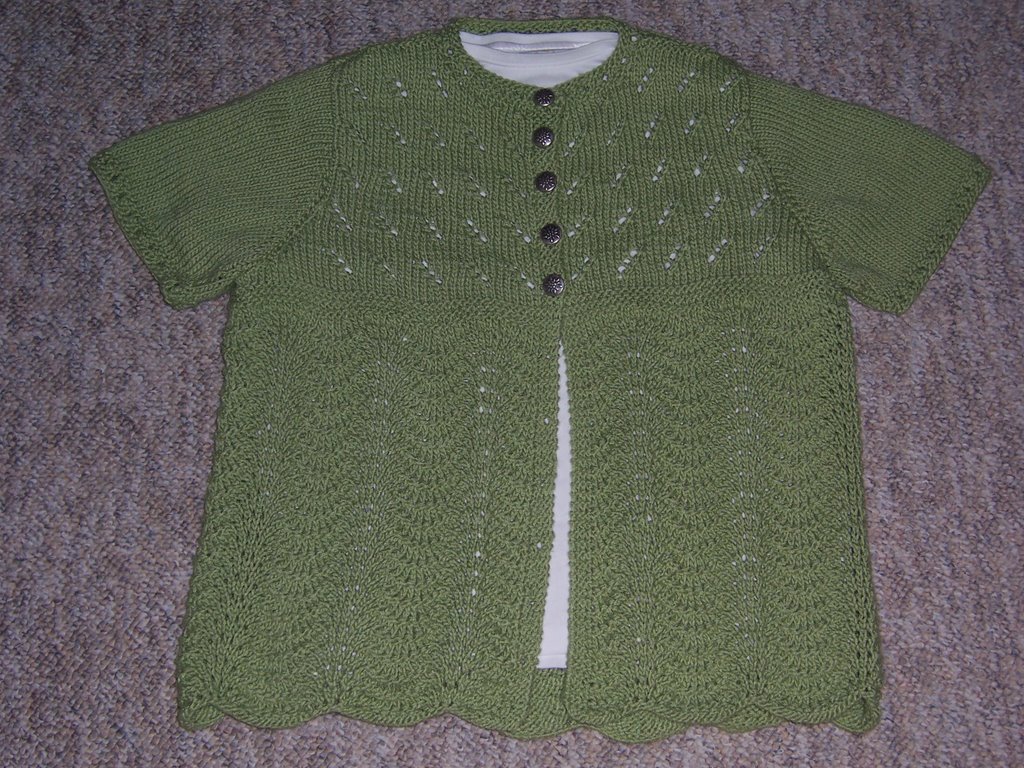
Here's a sweater I finished in time to wear on Easter. I call it "Edelweiss" It's knit with Coats&Clark "TLC Cotton Plus" -- a worsted weight cotton/acrylic that knits up beautifully. The lace patterns -- a variation of fan-and-feather and a slanted eyelt -- are both from traditional Austrian knitwear. So the pewter edelweiss buttons seemed especially appropriate!
I like the hip-skimming length and the open-to-underarm cardi feel of it. This sweater is perfect for a cooler-than-you-thought spring or summer evening to wear over a sleeveless dress or top! Or to those places that frown on bare shoulders.
Let me know what you think. I thought I'd see if Coats would like to buy the design.....
Subscribe to:
Comments (Atom)